Tuesday, July 22, 2008

The Skirt


One of the most complicated parts on R2 is the skirt underneath. There are a lot of compound angles, curves, and so one. I was baffled at first. A lot of builders seem to be roughing out an under frame in plywood and then scabbing together a surface in the rough shape with styrene, foam, MDF, or whatever. Several of the histories of this part of the build I looked at looked like very work intensive nightmares, with mediocre results. So I ruminated about it. Then the lightbulb went off.

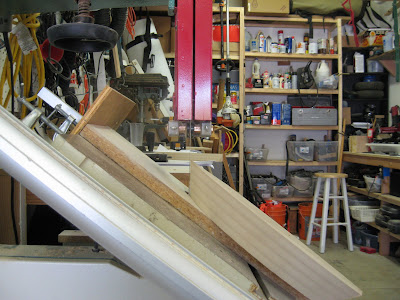
For the foundation of the skirt (here's a picture of it upside down) there are only 4 cuts--two beveled sides and two curving beveled ends. So I cut 4 pieces of MDF, and glued them together in a stack for a blank. If you've done this before, you know that the pieces drift when you start to clamp them together. One solution is to predrill a screw hole down through all four before they are glued, put the screw in and then take it out. Then after they are glue, put the screw back in. This will line them up. Or you can put clamps on the sides and ends while you are placing clamps on the top and bottom to hold them in place. I cut my blanks over sized so that some slippage wouldn't be a problem.

Once that's dry. I cut the edges and ends and got them all squared up. Then for the side bevel cuts. Two passes through the table saw set to 37 degrees gave me good results on those.

Now for the real Jedi trickery. My bandsaw has a tilting table. I set that over to 37 degrees with the circle jig installed on it. This took some time to set up, but it was worth it. I also put a new, fine tooth blade on it and got it all tuned up. The radius of the circle cuts on the top of this piece of the skirt is 6.75" I think. So I set the circle jig for 6.75 from pin to edge of blade. Again this took some time and some test runs to set up. Then once I had it all set up, cutting the curving bevel around the edges was like butter. To be honest, I had to do this twice before I got one I was really happy with. With some minor sanding to remove the saw marks this base looks great. Then I cut a cap according to specs, and fashioned the little rib pieces.

Next I'll glue and brad nail all of these one, and I think I'll just cut through the edge into the middle to cut out the square center for the foot. I can glue the cut back together and hide it behind one of R2s legs, I think. It'll be a lot easier to do it that way than to try to rout down through 2.5 inches of material and get it all straight and clean.
The Frame


The Astromech.net club has a lot of really useful files, including some very carefully drawn blueprints. Read it all carefully 10 times.

I've built the Mike Senna/Matthew Henrick wooden frame laid out there. They're good plans. There are few gaps, a few typos, and few outright mistakes, but they're free and overall very good. Mike Senna and Matthew Henrick have been really helpful to me on email with questions and clarifications too.

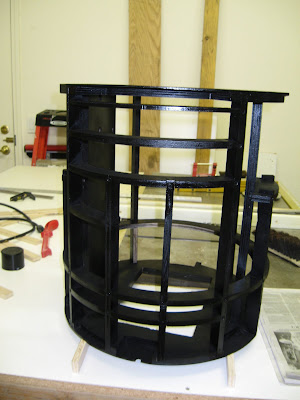
Here's the end result, all painted black and sexy.

A couple of issues: After comparing the skin blueprints and the frame, I figured out that the frame comes out to be 19.09 inches and the skins are 19.35 inches. So that's a 1/4" overlap. I couldn't figure out what to do with that extra skin. After emailing Henrick and Senna, I think we concluded that the plans show the uprights to be too short. I ended up recutting the uprights and adding 1/8" or so to the tops and bottoms of them. Now my skins will just hang over the top and bottom edges.

I haven't gotten my dome yet, but I figure that when the Rockler bearing ring is installed under the dome it will be flush with the bottom of it, but I might be wrong. I plan to do some adjusting when I get those. If I have to, I'll router out a channel in the top plate for the bearing to sit in so that the dome sits nice and close to the skin edge.

On the subject of routers: the practice among builders seems to be to use a router and a circle jig for cutting circles. I've got to say this sucks. It's noisy, creates shitloads of sawdust, it's hard to see what you're doing, and routers are hard to control. The bits overheat, the wood burns, and so on. The secret that all the Jedi know is to use a bandsaw. Take a little bit and set up a circle jig on the band saw. This can be just a scrap secured to the table, draw a straight line out perpendicular from the blade's leading edge, measure the radius of your circle, drill a little hole, insert a finish nail, put a little hole in the middle of your blank and you're ready to go. Cutting circles this way is accurate and almost effortless. In fact, if you're going serious about this job, spend some cash on a good band saw and you'll be a happy camper. Grizzly tools (grizzlytools.com) are cheap, reliable Internet power tools. My 220 volt Grizzly band saw will cut through a truck.

The problem is that you can cut the outer edge of rings like the ones in the plates for the frame, but you can't cut the inner circles unless you're willing to cut through the ring itself to get the blade inside. This can be worth it in some situations. You can go back, pry open the cut, smear wood glue in the gap, and let it dry and be good as new. But if not, then it's back the router and the circle jig. My ears are still ringing and I still have saw dust in my shoes. Use a good bit--maybe one that removes material for cutting instead of one for cutting grooves.

So after some back and forth, and some tweaking, my frame is done. I opted to drill pilot holes and counter sinks in all the intersections and put tiny screws in (1/2" and 3/4") to hold it all together. I am anticipating needing to disassemble it when I start trying to fit the various surface features on the R2. Once I am sure that I won't need to take the frame apart, I'll glue and screw it. It'll be bomber. It's bomber now just with screws.

Decisions

It's all the rage now to build your whole R2 out of CNC machined aluminum parts. A lot of builders have figured out how to either manufacture the parts themselves or they contract with a shop to do a run. Then every 6 to 18 months they do a run of 20 or so parts for all of the interested builders. So the custom is for you to watch the forums on Astromech.net for a long time and every once and a while a run comes up. Pay your money, wait another 3-6 months, get part in mail, then wait on other parts. Once you've got them all collected, put them all together with some fabricating, adjusting, and building. The kicker is that these parts are really expensive. Aluminum frames are going for $750, skins for a couple hundred, domes for $500, feet for several hundred, foot motors for $700, legs for hundreds, and so on. It looks like it is possible to assembly a fully machined aluminum R2 now by this method that's even better in lots of ways than the models they used on the sets. But it'll easily run you $5,000.

If you can do that, then that's cool. But here's my deal: I am a compulsive DIY guy. On my house, my dryer, my car, my patio, my kitchen sink, I figure I can pay a profession a few hundred bucks to do it, or I can spend the same cash on some parts, some tools, some research, and some experimentation and I'll learn how to do a decent job of it myself, and I'll have the skills and knowledge from now on. So what I am saying is, CNC machined aluminum parts are for pussies. Put your back into it and take the opportunity to make something better of yourself.

I have to say that with all due respect though because there are some brilliant machines out there, assembled by smart, clever guys and I have learned a lot from them.

So with that said, I'm going to go with a wood frame, styrene hand cut skins, hand fabricated details, hand built legs, etc. I'll have to buy some machined parts, I figure, like the dome and some details, but I'm going to try to DIY as much as I can.
Dan Baker, at: http://bakercraft.net/dan/r2d2/r2d2_index.htm
has got the right idea. I've learned a bunch from his site, and Victor Franco's too.

Get Educated

Once I realized I had the bug to build, it was time to scour the web and learn as much as possible from those who went before. Joined the R2D2 Astromech.net club, read and reread all their files, read as many blogs and web pages as I could find about building. I learned a lot of what not to do and some clever solutions to complicated problems from those guys. And I found most of them to be friendly and helpful on email.

Gotta Build an R2D2

Of course they ask why? But what are you going to do. . . . NOT build a full size, remote control, fully functional R2D2? How lame would that be?